Most of us only use a fraction of what our machines can really do.
Well today’s blog is all about starting to explore some of the fun things that are right at our fingertips and can push our creativity even further. You know, those functions on our machine outside of our favourite stitches and presser feet that we use in just about every single thing we make…!
When I started planning this project, I knew I wanted a versatile cropped jacket I could throw on over a casual outfit or a nice a dress. I also wanted it to be one of those garments that eases that period when the seasons are changing and it’s not quite cold nor hot!
Once I had come up with the design my next goal was to have some fun with the embroidery arm on my Husqvarna Ruby! ( You can see our range of embroidery machines here). I loved flipping through the sample book and dreaming up all the possibilities. There are so many options to combine designs and even create your own pop-up embroidery or lace applique.
I chose to go with a monochromatic design and got to playing with placing these elements into a shape I thought would work well on my frill sleeve.
There’s a certain thrill that comes with loading a fresh hoop, pressing start on a design, and getting to see those stitches come to life!
But the embellishment doesn’t have to stop with the embroidery. Our only limit is our imagination! I decided to take the embroidery thread use it in the upper looper of my overlocker (I’m working on an Amber Air S|400) to create a rolled hem on the sleeves and really draw the eye.
Here’s a hot tip if your overlocker is stuck on the one setting because you’re scared, you’ll never find the elusive perfect tension again – take a photo pf your settings before you change them! Then happily switch it up and start making the most of your overlocker too! All it took to go from finishing the insides of my jacket to doing the rolled hem was reducing the stitch length, reducing the differential feed dial, flipping the switch to ‘tight’ and another switch from N to R!
I’m so excited to have this jacket to layer into my wardrobe and love the direction that the embroidery took me in. If you ask me, it’s what makes the entire garment!
So here I am encouraging you to jump in and explore some more of what your machine can do too! I’d love to see what creativity it sparks for you.
Don’t forget to share your projects with us on Instagram, tagging @husqvarnvikingsewingaus and using the hashtags #husqvarnavikingaustralia #husqvarnavikingsewing #keepingtheworldsewing or our Facebook page Husqvarna Viking Australia.
By Aims from Indy Bindy Fabric
Does the thought of gathering meters of fabric send you into a cold sweat?
Well, I’ve got a treat for you today. I made this dress from cutting out, to gathering and adding the final stitches, between school pick up and dinner! A simple switch of a foot on my overlocker made the gathering an absolute breeze. To the extent that I am planning my next make with tiers and tiers of gathered layers just for the sheer satisfaction of repeating this again!
What’s more, I made it without a pattern and I’ll show you how.
Elastic (length: ½ waist measurement or bottom of bodice)
Thread
Scissors/Rotary cutter
Measuring tape
General sewing tools
Cutting Out
Start off by cutting out a series of rectangles
Two for the bodice (one main fabric and one lining). The width should be your full bust measurement, plus 2cm seam allowance, minus the width of the open back you’d like. The height should be the length of where you want the bodice top to start and finish plus 2cm. I measured mine to my natural waist. My rectangles were 88cm x 32cm.
Next cut two rectangles for the skirt (one for the front and one for the back).
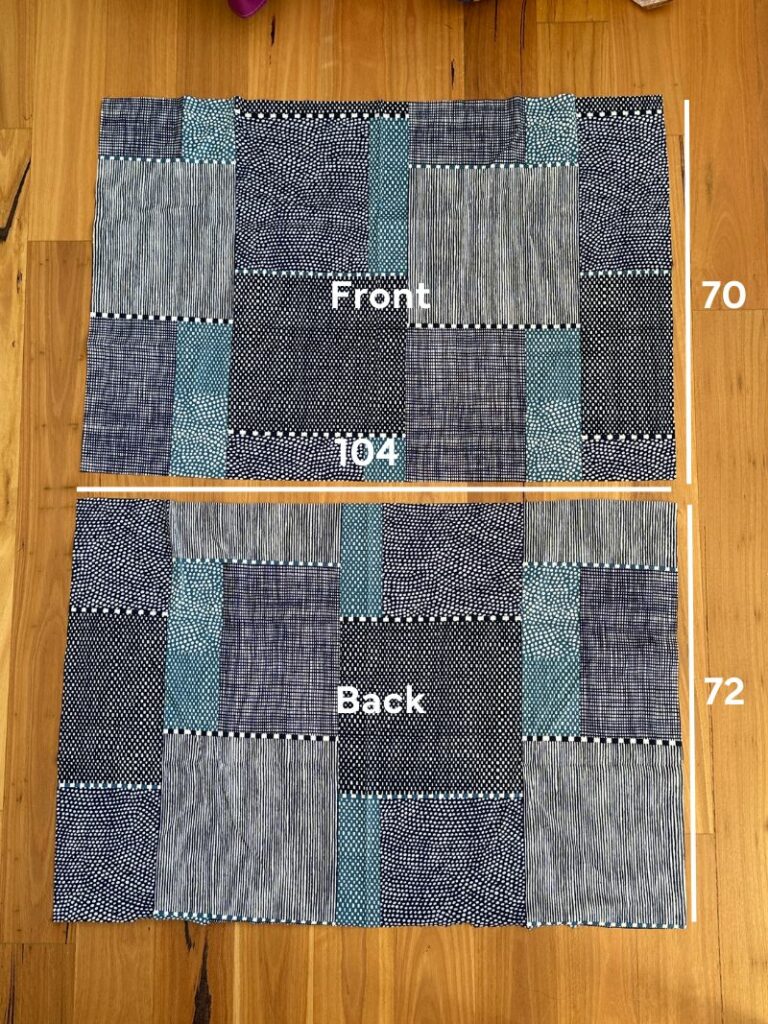
The front should be the width of your hip measurement by the height of your desired length from the bottom of your bodice. My front rectangle was 104cm x70cm.
The back should be the same as your front piece but with 2cm added to the height. My back rectangle was 104cm x72cm.
Now it’s time to cut out the straps. I made mine 4cm by the width of my fabric (110cm) for simplicity, but you could make them much shorter. To work this out you can measure from the top of your bodice, over your shoulder to where your bra strap would normally sit and double the measurement, so you have enough length to tie.
The Bodice
Start by marking a straight line down the middle of the two bodice pieces.
Next make a straight line either side of the centre, equal to ¼ of your full bust measurement. Our next step is to work out how low you want the bodice to scoop below your arm. I chose 10cm below the height of my bodice. Mark the distance you choose (A) along the vertical lines you just made. Also mark the halfway point along each short edge of the rectangle (B).
Measure the distance between your bust points and make another straight line either side of the centre, equal to half the distance of your bust points.
Now you need to connect the top of the bust point line to points A and B. You can eyeball this an create a curved line that ends perpendicular to the side seam. Otherwise, if you have a French Curve ruler, make it easy for yourself and use this! Cut the bodice main fabric and lining along this line.
At this point you may also like to add some shaping to the bodice. On both the main fabric and the lining, along the bust point line, you can add darts from the bottom of the bodice up until 2cm below your bust point. Don’t make the darts go all the way to your bust point, you could end up with a Madonna-inspired look! Divide the difference between your full bust measurement and the measurement where the bodice ends between the base of the two darts. My fabric has some stretch so I skipped adding darts.
Make your straps. I wanted quite narrow straps and didn’t want to fiddle with turning them right side out. So I chose to fold them in half, then half again to the inside and stitching down. Be sure to turn one end in so it has a clean finish.
your bodice pieces on top of each other with right sides facing. Slip the raw end of you straps between the two layers so that they are 1cm in from the corner. Stitch around the base, sides and top, leaving the width of ½ your waist (or whatever point your bodice ends) measurement open at the centre front. Clip the seam allowances at the opening to allow it to flip out easily. Trim the corners, clip the curves and turn it right side out. I like to use an extra-long chopstick to get into the corners and help shape it.
Give the bodice a good press and then press up the lining side of the opening by 1cm. This should now line up with the previously stitched seam
The Skirt and Gathering
Now we get to the fun part. Head to your over locker and pop off your standard presser foot. Pop on your Gathering Foot (G) and get ready for some magic! You can purchase the gathering foot I’m using or the Amber Air SI400 as part of the Utility Feet Kit seen below
Before you go gathering your skirt piece it’s best to test your gathering ratio on some fabric scraps. We are aiming for a ratio of 50%. Initially I had my tensions around 3, my stitch length at 3 and my differential feed at 2. I tested this on a scrap but it didn’t quite gather it to half the original length, so I increased the stitch length to 4 and that did the trick!
Once you’re happy with the gathering ratio, whizz the top of your front piece through the overlocker, double check the new length and do a happy dance! Hot tip: write down or take a photos of your tension and stitch length settings and keep them somewhere you’ll easily find them again so you cut out the experimenting next time!
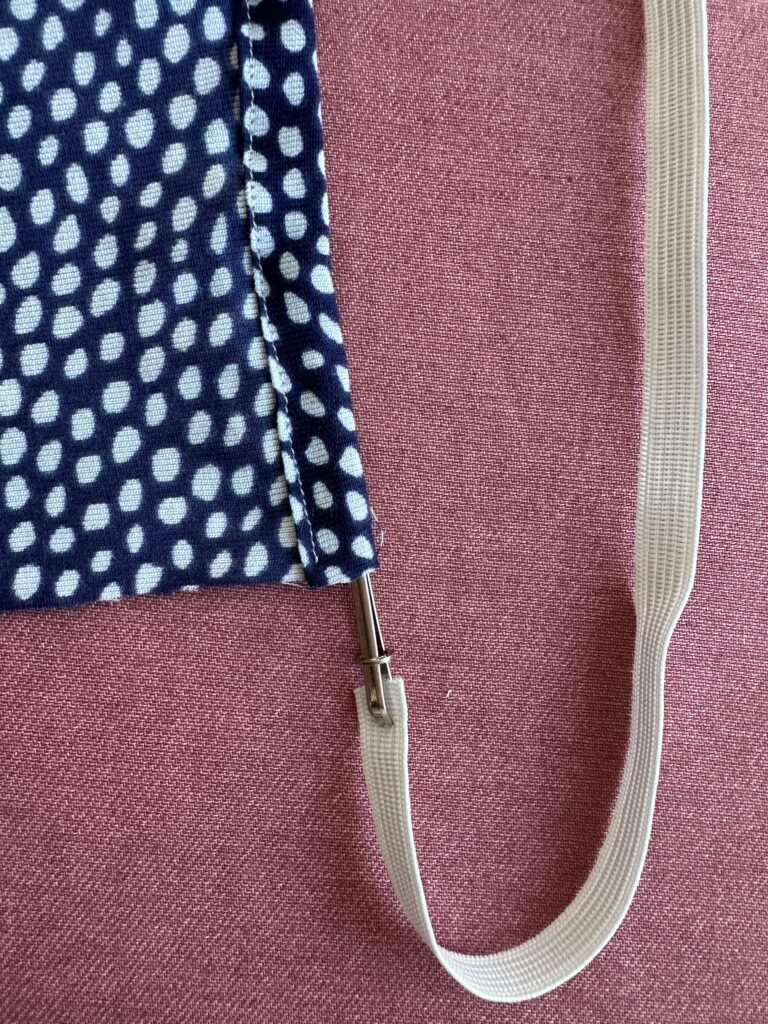
Now create a casing at the top of your back skirt piece. I pressed a line 3cm from the top of the back piece as a guideline. I then pressed the top edge under, folded it over again to meet the pressed guideline and stitched in place. Once you have a casing, thread your elastic through and secure at each end. The elastic should be ½ waist measurement (or where the bottom of the bodice sits). My waist measurement is 83cm so my elastic was 41.5cm.
Sew your skirt front and back together at the side seams and finish the seam with your preferred method. The gathered front skirt should sit 1cm above the top of the elastic top of the back skirt. You’ll need this later when attaching the skirt to the bodice
Hem your skirt. I decided to speed up the finishing of my dress even more by using my overlocker again to create a rolled hem along the bottom edge. To do this, switch back to a standard presser foot, remove the thread from the left needle, and decrease the differential feed (mine was on 1). I also switched the lower looper pretension to tight and the stitch finger position to R. Again, practice on scraps first to make sure you’re happy with the result.
Attaching the skirt to the bodice
Connect the gathered top edge of the skirt front to the unpressed edge of the bodice front opening, with right sides together. Stitch in place with a 1cm seam allowance. Fold over the pressed edge of bodice lining opening so that it covers the line of stitches you just made. Pin it in place and then from the front side, stitch in the ditch to secure.
Lastly, fold over the outer edges of the bodice towards the inside to make a channel for your straps and stitch in place. Thread the straps through the opposite channel and wear your new dress with pride!
You now have a summer dress that was as easy as a breeze!
Don’t forget to share your projects with us on Instagram, tagging @husqvarnavikingsewingaus and using the hashtags #Husqvarnavikingsewing #keepingtheworldsewing #husqvarnavikingaustralia or our Facebook page Husqvarna Viking Australia.
What are they and why do I need one?
Overlockers. You’ve most likely heard of, have one or have been thinking about getting one. Am I right? But what about an Air Threader?!
An overlocker (also known as a serger) is a type of sewing machine that uses multiple threads to seam fabric and also overcast the raw edges. An Air Threader is all this and more. Today I’ll be sharing with you exactly what they are and why they’re so exciting! I’ll be using my Amber™ Air S|400 as the example.
SO many people dread using their overlocker. Not because they don't love it – overlockers make clean seam finishes and sewing with knits an absolute breeze. But when it comes to threading an overlocker, it can send the most experienced sewist straight out of their sewing room and into procrastination!
If you’ve attempted to thread a standard overlocker before, you’ll likely know the process can be frustrating, finicky and tedious. And it has to be done in the correct order every time a thread breaks or a new colour is needed.
That said, you can absolutely nail threading a standard overlocker, armed with your manual, some patience, and a pair of tweezers. Practice makes perfect … or at least practice makes easier!
But threading tends to be one of the most intimidating hurdles for sewists who are new to overlockers. So, if you’re making up new swear words, feeling like throwing your machine out the window, or just over looking up the threading order and fiddling with threading the awkwardly placed loopers, read on my friend.
If you’re putting off what you really want to sew just because you don’t want to re-thread your machine – I’m going to fill you in now on the difference an Air threader can make.
Imagine an overlocker that's smart enough to thread itself. Using the power of air, with the flick of a switch, the turn of a dial and a pull of a lever – the Amber™ Air S|400 air threader does just that! No more struggling to threader those pesky looper needles!
With the Amber™ Air S|400 air threaders, the threading ports are connected to the end of the loopers by a series of tubes. The tubes connect when the threading system is engaged. So, once you’ve run the thread through the guides on the top of the machine, all you have to do is insert the thread into the port. A jet of air is then created when the pump lever is pulled, and the threads are taken through the tubes and all the way through the looper with the air flow.
These tubes also mean that you can thread your machine in any order without worry. You can change just one thread, without rethreading the rest and do it in under a minute!
Just look at those threads starting in the ports on the right, invisible in the tubes and coming out the loopers on the left!
If you struggle with threading the left and right needles too, it’s worth noting that the Amber™ Air S|400 air threaders are for the loopers only. However, there are needle threaders for the needles too!
It’s rubber feet so there’s no wobbly dance across my sewing table
It has 15(!!) stitch options
My favourite thing is definitely the fact that I no longer let the thread colour that is currently in my overlocker determine the colour of my next make!
Why not try one out at your local Husqvarna Viking retailer today. I bet you’ll be blown away!
Enter your contact details to sign up
or sign in to your Payright account
Once approved your
purchase will be dispatched
Right when you need it – Payright
Important Information:
We want to ensure you have a positive payment experience and have made the checkout process simple.
We take responsible lending seriously so credit is only extended to approved customers. Please
ensure you read the terms
and conditionsfor further information and note that PayRight is not available on all
purchases.